Streamlining Spring MVC with Per-Module Connection Pools


At Help Scout, we invest a lot of time to ensure our applications make the best out of their databases.
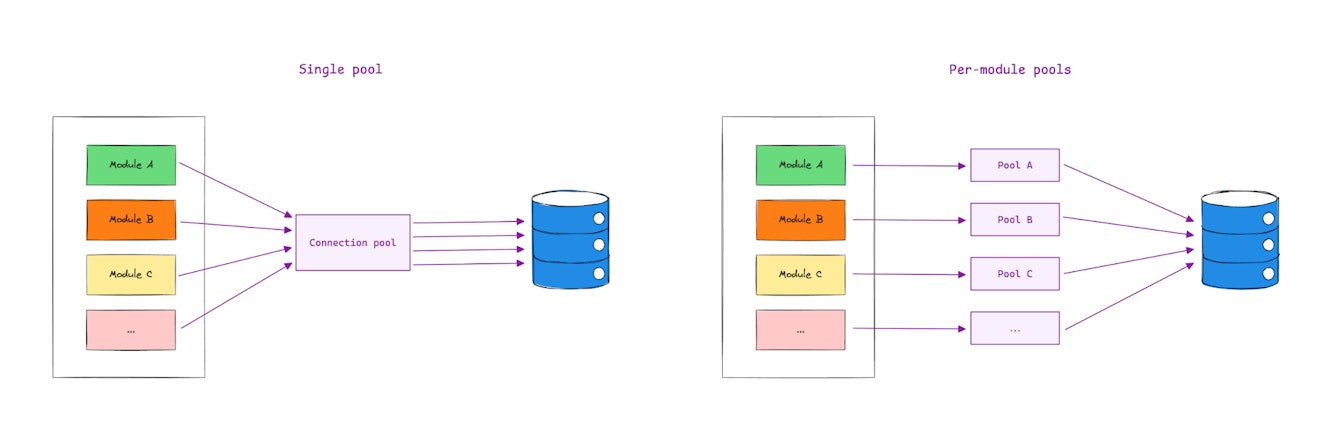
As Spring applications scale, managing datasources can become unwieldy. Large monolithic applications often accumulate multiple modules, each with distinct logic yet sharing the same datasource. Over time, this can lead to issues like performance bottlenecks, connection pool exhaustion, and entangled dependencies that slow down development and maintenance.
A single datasource configuration may be sufficient in the early stages of development. However, as the application scales, traffic spikes in one module can starve others of connections, leading to one particular module directly impacting others (increasing latency, degrading performance, etc.).
This is where a per-module datasource approach can help break down complexity by assigning dedicated datasources to modules. A more granular control over pool sizes and settings allows modules to scale independently while isolating performance issues.

In this post, we’ll walk through setting up a per-module datasource configuration in a Spring MVC application using Spring Boot and Kotlin. Hence, this won't cover WebFlux since it is architecturally different and would require an adapted approach. Whether dealing with a large monolith or transitioning to microservices, this pattern will help streamline your datasource management.
Project setup
To get started, you can create your multi-module app from scratch via Spring Initializr or check out our sample project: https://github.com/helpscout/connection-pool-per-module.
The project structure includes two modules (notification and user) and a shared module for common datasource configuration:
connection-pool-per-module/
├── buildSrc
├── src/
│   └── helpscout
├── notification/
│   └── helpscout.notification
├── shared/
│   └── helpscout.shared
└── user/
    └── helpscout.user
Each module contains a simple JPA entity, repository, and controller for listing the entries.
We won't delve deeper into the specific Gradle, Spring, Kotlin, Testcontainers, or Flyway (database versioning) configurations as they’re outside the scope of this post. For details, please refer to the project's README.
How to run it
Upon starting the application via ./gradlew bootRun, you may notice the following lines in your logs:
Routing datasource to DEFAULT
...GET http://localhost:8080/v1/usersGET http://localhost:8080/v1/notifications
Double-check your logs to verify whether the routing occurred effectively:
Routing datasource to USER
Routing datasource to NOTIFICATION
Datasource configuration
Spring's auto-configuration is the most straightforward way to configure datasources. You set the param values in your app's application.yml (or application.properties) file, and Spring will take care of wiring up the DataSource bean and attaching all the underlying dependencies.
It can quickly become cumbersome to manage several datasources this way, especially if you have a lot of modules. Repeating the same properties for every module increases maintenance overhead.
Instead, we use a programmatic approach to avoid duplication. Let's take a look at the application.yml:
spring:
  datasource:
    url: jdbc:mysql://localhost:3306/helpscout
    password: test
    username: test
    hikari:
      connection-timeout: 20000
      max-lifetime: 300000
    instances:
      - name: default_pool
        pool-size: 10
      - name: notification_pool
        pool-size: 10
      - name: user_pool
        pool-size: 10
Since all the datasources share the same connection and HikariCP properties, we segregated the specific pool settings under a new property called instances for easier fine-tuning.
Notice that we use a fixed pool-size since HikariCP recommends using fixed-size pools "for maximum performance and responsiveness to spike demands."
These properties can be easily captured in a POJO via @ConfigurationProperties:
@ConfigurationProperties("spring.datasource")
class ModuleDataSourceProperties : DataSourceProperties() {
    lateinit var hikari: HikariConfig
    lateinit var instances: List<InstanceProperties>

    class InstanceProperties {
        lateinit var name: String
        var poolSize: Int by notNull()
    }
}
We're also reusing the HikariConfig from com.zaxxer.hikari (no need to reinvent the wheel here).
Next, we configure the datasources programmatically:
@Configuration
@EntityScan("helpscout")
@EnableConfigurationProperties(ModuleDataSourceProperties::class)
class SpringDataJpaConfiguration {

    @Bean
    @Primary
    fun dataSource(dsProperties: ModuleDataSourceProperties): DataSource {
        val targetDataSources = dsProperties.instances.associate { instance ->
            ModuleName.getStartingWith(instance.name) to dsProperties.initDataSource(instance)
        }

        return createRoutingDataSource(targetDataSources)
    }

    private fun ModuleDataSourceProperties.initDataSource(instance: InstanceProperties) =
        (initializeDataSourceBuilder().build() as HikariDataSource).apply {
            poolName = instance.name
            maximumPoolSize = instance.poolSize
            connectionTimeout = hikari.connectionTimeout
            maxLifetime = hikari.maxLifetime
       }

       private fun createRoutingDataSource(targetDataSources: Map<ModuleName, DataSource>) =
        ModuleRoutingDataSource().apply {
            setTargetDataSources(targetDataSources.toMap())
            setDefaultTargetDataSource(targetDataSources.getValue(DEFAULT))
        }
}
Notice how we're making use of ModuleDataSourceProperties to iterate through all the configured instances and create our target datasources.
The map keys will be simple enums matching the same module names (that's how we'll later map each request's class package to its equivalent module name):
enum class ModuleName {
    DEFAULT,
    NOTIFICATION,
    USER
}
Context handling
To tell Spring to route each request to its proper datasource connection, we need to extend AbstractRoutingDataSource: an abstract DataSource implementation that routes getConnection() calls to one of the various target datasources based on a lookup key that's usually, but not necessarily, determined through some thread-bound transaction context.
class ModuleRoutingDataSource : AbstractRoutingDataSource()

    override fun determineCurrentLookupKey(): ModuleName = DataSourceContext.current.also {
        println("Routing datasource to $it")
    }
}
The println will help validate which datasource is currently bound to each thread.
The context holder implementation is crucial since it acts as a centralized storage mechanism for the current context via a ThreadLocal and provides static methods to set, retrieve, and clear the context.
Utilizing ThreadLocal is vital for concurrent transactions, as it binds the context to the thread that is executing the current operation:
object DataSourceContext {

    private val contextHolder = ThreadLocal.withInitial { DEFAULT }

    @JvmStatic
    fun setDataSource(module: ModuleName) = contextHolder.set(module)

    @JvmStatic
    val current: ModuleName
        get() = contextHolder.get()

    @JvmStatic
    fun reset() = contextHolder.remove()
}
The AbstractRoutingDatasource, in turn, leverages the DataSourceContext to fetch the current context, which it then uses to determine the appropriate datasource.
Intercepting and routing
There are a few strategies to effectively establish the appropriate lookup key within the context holder, like creating a service layer that accepts the context as an input parameter, configures the context before invoking the data-access layer, and clears it afterward.
A more pragmatic approach we chose consists of leveraging AspectJ to intercept a specific stereotype (e.g., @RestController), identify from which package the request originated, and select the correct datasource:
@Aspect
@Component
class RoutingDataSourceTransactionInterceptors {

    @Pointcut("@within(org.springframework.web.bind.annotation.RestController)")
    private fun inController() {
    }

    @Around("inController()")
    fun proceedFromController(pjp: ProceedingJoinPoint): Any? {
        val module = inferModuleName(pjp)
        return useReplica(pjp) { setDataSource(module) }
    }

    private fun inferModuleName(pjp: ProceedingJoinPoint): ModuleName {
        val packageName = pjp.staticPart.signature.declaringType.packageName
        val predicate: (ModuleName) -> Boolean = {
            packageName.contains(it.name, ignoreCase = true)
        }

    return ModuleName.entries.find(predicate) ?: DEFAULT
    }

    private fun useReplica(pjp: ProceedingJoinPoint, setDbReplica: () -> Unit): Any? = try {
        setDbReplica()
        pjp.proceed()
    } finally {
        reset()
    }
}
Keep in mind that this strategy was simplified to keep things short, but you might consider a more robust implementation that better suits your needs (e.g., handling async application context events).
The DEFAULT is always picked up when no module has been identified. You may adapt this strategy to log and track outliers or throw an exception in case you wish no connection to happen outside of the module boundaries.
Integration tests
You should also notice that our sample project includes integration tests for each module to ensure they're picking up the correct connections.
Take a look at how DefaultDataSourceIntegrationTest validates the routing to DEFAULT whenever a request is triggered from a package that's not mapped:
// config annotations
class DefaultDataSourceIntegrationTest {

  @Autowired
  private lateinit var mvc: MockMvc

  // other settings (...)

  @Test
  fun `test endpoint for wrongly mapped package`() {
      mvc.perform(get("/test/default").contentType(APPLICATION_JSON))
          .andExpect(status().isOk())
  }

  @RestController
  @RequestMapping("/test")
  class TestController {
      @GetMapping("/default")
      fun getDefault() {
          assertThat(DataSourceContext.current).isEqualTo(DEFAULT)
      }
  }
}
Summing up
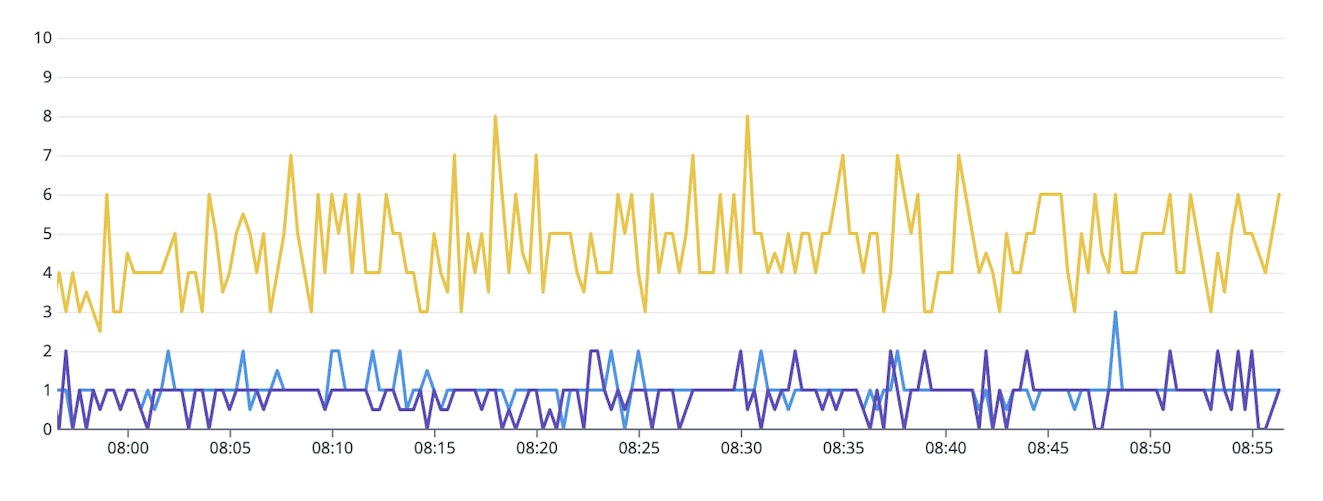
Splitting datasource configurations by module improves scalability, reduces contention, and simplifies monitoring.
The segregated metrics instead of single metrics for each pool help us better troubleshoot whether a specific module's connections are causing spikes or outages.

A few other considerations to keep in mind:
Extending this setup to split read and write connections would be easy and can further improve performance, preventing long-running read queries from blocking critical write operations.
If you need the datasource beans registered into Spring's application context, consider using ImportBeanDefinitionRegistrar instead.
Consider adopting Java 9 modules to enforce encapsulation and clear separation between your modules. This way, you can simplify your interception logic by switching the package by the Module via
pjp.staticPart.signature.declaringType.module.
Diogo Souza
Diogo Souza is a Senior Backend Engineer at Help Scout. While he’s usually having fun with all things JVM (and occasionally jamming Kafka topics), you may also find him nomadizing, creating weird linear regressions, or giving humble opinions at StackOverflow. Connect with him on LinkedIn.